프로그래밍/- java
자바 유용한 클래스 , 다양한 기능들
즐겁게 하하하
2022. 1. 30. 17:20
728x90
Object 클래스
  - 모든 클래스의 최상위 클래스
  - final 로 선언되지 않은 메서드는 재정의해서 사용이 가능
  - import.java.lang.*;

    toString() : 객체의 정보를 String으로 바꾸어서 사용할 때 쓰임
    equals()   : 두 인스턴스 비교하여 boolean 값 반환
    hashCode() : 인스턴스 저장 주소를 반환 > index = hash(key)
    clone()    : 객체 원본을 복제 하는데 사용, implements Cloneable 을 명시해야 한다.
                 public class Student implements Cloneable{ }
String 클래스
String java = new String("java");
String android = new String("android");
System.out.println( System.identityHashCode(java) ); :: 주소 다름
java = java.concat(android); :: java + android
System.out.println( System.identityHashCode(java) ); :: 주소 다름
:: 새로운 문자열이 생성됨, 힙 메모리 낭비
============================================================
StringBuilder 클래스 ( 단일 쓰레드 에서 사용 , StringBuffer보다 성능은 우수 )
StringBuilder sb = new StringBuilder();
sb.append("hello");
sb.append(" ");
sb.append("jump to java");
String result = sb.toString();
System.out.println(result);
========================
StringBuffer sb = new StringBuffer();
sb.append("jump to java");
sb.insert(0, "hello ");
System.out.println(sb.toString()); // hello jump to java
========================
StringBuffer sb = new StringBuffer();
sb.append("Hello jump to java");
System.out.println(sb.substring(0, 4)); // Hell
========================
StringBuffer 클래스 ( 멀티 쓰레드 동기화(순서지정) 가능 )
문자열을 여러번 연결하거나 변경할 때 사용하면 유용함
toString() 메서드로 String반환
String java = new String("java");
String android = new String("android");
StringBuilder buffer = new StringBuilder(java);
System.out.println(System.identityHashCode(buffer)); :: 주소같음
buffer.append("android"); :: java + android
System.out.println(System.identityHashCode(buffer)); :: 주소같음
java = buffer.toString();
============================================================
sb.append(값)
- StringBuffer, StringBuilder 뒤에 값을 붙인다
sb.insert(인덱스, 값)
- 특정 인덱스부터 값을 삽입한다
sb.delete(인덱스, 인덱스)
- 특정 인덱스부터 인덱스까지 값을 삭제한다
sb.indexOf(값)
- 값이 어느 인덱스에 들어있는지 확인한다
sb.substring(인덱스, 인덱스)
- 인덱스부터 인덱스까지 값을 잘라온다
sb.length()
- 길이 확인
sb.replace(인덱스, 인덱스, 값)
- 인덱스부터 인덱스까지 값으로 변경
sb.reverse()
- 글자 순서를 뒤집는다
String에서 concat, + 사용 시 속도가 왜 느려지나?
String은 불변(immutable)하기 때문에
concat, + 사용 시 기존 값을 버리고 새로 할당해서
1000번 이상 수행할 경우 급격히 느려짐
StringBuffer, StringBuilder를 사용하는 이유는?
String에서 concat, +를 천번 이상 사용할 경우
속도가 급격히 느려지기 때문에 해당 상황에는
변하는(mutable) StringBuffer와 StringBuilder를 사용한다
StringBuffer, StringBuilder의 차이는?
StringBuffer는 공통 메소드 동기화로 인해
멀티 스레드 환경에서만 사용
그 외에는 StringBuilder를 사용하면 됨
============================================================
textBlock( java13 부터 )
문자열을 """ """ 사이에 이어서 만들 수 있음
html, json 문자열을 만드는데 유용하게 사용할 수 있음Class 클래스 :: Class.forName("클래스 이름") 메서드로 클래스를 동적으로 로드
- 자바의 모든 클래스와 인터페이스는 컴파일 후 class 파일이 생성됨
- Class 클래스는 컴파일 된 class 파일을 로드하여 객체를 동적 로드하고,
정보를 가져오는 메서드가 제공됨
- 동적 로딩
> 실행(runtime) 중에 데이터 타입을 binding 하는 방법
- 클래스 정보 얻기
> 원격 프로그래밍, 객체의 타입을 알 수 없는 경우에 사용 내부 클래스 ( 중첩 클래스라고도 함 )
- 내부적으로 사용할 클래스를 선언 (private으로 선언하는 것을 권장)
- private이 아닌 내부 클래스는 다른 외부 클래스에서 생성할 수 있음
- 인스턴스 내부 클래스, 정적(static) 내부 클래스,
지역(local) 내부 클래스, 익명(anonymous) 내부 클래스
class A { :: B의 외부 클래스
class B { } :: 내부 클래스
=> B클래스가 A 클래스 에서만 이용될때
=> 외부클래스인 A 의 맴버에 객체 생성 없이 접근 가능
}
1. static 내부 클래스
- 외부 클래스 생성과 무관하게 사용할 수 있음
2. local 내부 클래스
- 메서드 호출 이후에도 사용해야 하는 경우가 있을 수 있으므로 지역 내부
클래스에서 사용하는 메서드의 지역 변수나 매개 변수는 final로 선언되어
값을 출력가능하지만 변경은 불가능 하다.
3. 익명 클래스
- 이름이 없는 일회용 클래스, 정의와 생성을 동시에 한다.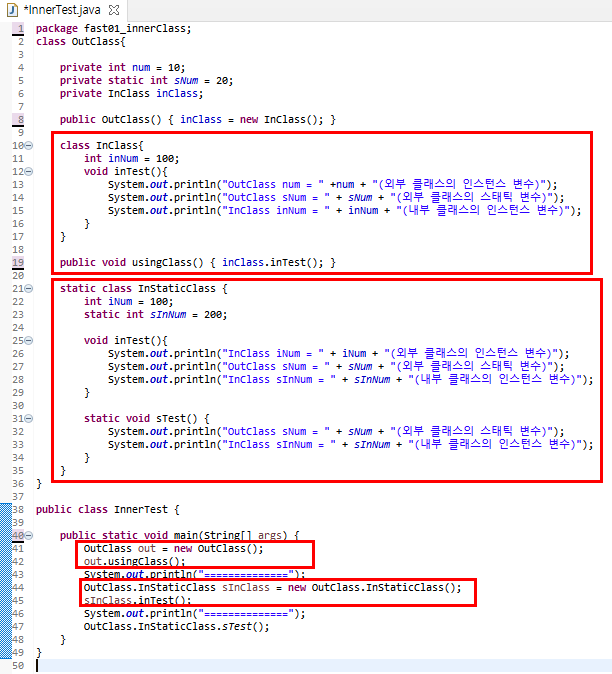


★ 애너테이션 : 주석처럼 프로그래밍 언어에 영향을 미치지 않으며 유용한 정보를 제공한다.
  - 기본값 지정 가능하다( null 제외 ) > int count() default 1;
  - 요소의 타입이 배열인 경우에 {} 를 사용 > @Test( testTools={} )
  - 요소인 추상 매서드는 구현할 필요 없다 , 사용은 가능하다.
  - 요소의 타입은 기본형, String, enum , 애너테이션 , Class 만 가능
  - 괄호 안에 매개변수 불가
  - 예외 선언 불가
  - 요소를 타입 매개변수로 정의할 수 없다. <T>

  @애너테이션
  public void method(){ }
  @SuppressWarnings( {"deprecation" , "uncheked" } ) :: 둘이상의 경고를 동시에 억제
   - 컴파일러가 주는 에러를 확인햇다는 표식이 된다.
   - Xlint 옵션으로 컴파일 하면 경고 메시지를 확인 할 수 있다.

★ 메타 애너테이션 : 애너테이션을 만들때 사용
  java.lang.annotation 패키지에 포함됨
   @Target( {"FIELD" , "TYPE" } )
   @Retention( RetentionPolicy.SOURCE )
      - 컴파일러에 의해 사용되는 애너테이션 유지정책 : SOURCE
      - 실행시 사용가능한 애너테이션 유지정책 : RUNTIME
   @Repeatable( ToDos.class )
      - Todo 애너테이션을 여러번 사용 할 수 있게 한다.

★ 마커 애너테이션 : 요소가 하나도 정의되지 않은 애너테이션
람다식
  - 함수(메서드)를 간단한 식으로 표현하는 방법
  - 익명 객체 , 익명 클래스

   1. 메서드의 반환타입과 이름 제거하고 ->를 {} 앞에 추가
   2. 반환값이 있는경우 식이나 값만 적고 return 생략가능 ; 안붙임
   3. 매개변수의 타입이 추론가능하면 생략가능
      단 매개변수가 하나인경우 타입이 없을때만 생략가능
   4. 블록안의 문장이 하나뿐일때 {} 생략가능 ; 안붙임

   int max ( int a , int b ){  return a }
   1. ( int a , int b ) -> {  return a; }
   2. (int a , int b ) -> a
   3. ( a , b ) -> a
      (int a) -> a * a   ( O )
      (a) -> a * a   ( 에러 )
   4. ( int i ) -> System.out.println(i)
   5. @FunctionalInterface
      public interface Add {   public int add(int x , int y);  }
      public class AddTest {
         public static void main(String[] args) {
		    Add addL = (x,y)-> {return x+y; };
		    System.out.println(addL.add(2,3));
	    }
      }
스트림
- 읽기만 할뿐 변경하지 않는다. Iterator 처럼 일회용!
- 최종 연산 전까지 중간연산이 수행되지 않는다.( 지연된 연산 ) :: 중간 → 최종 (x)
- 작업을 내부 반복으로 처리한다.( forEach 사용 가능 )
- 작업을 병렬로 처리가 가능하다. ( 멀티 쓰레드 )
병렬: parallel(); / 직렬: sequential();
- 컬렉션( List , Set , Map ) , 배열 => Stream => 중간연산(n번) => 최종연산(1번)
중간연산 : 결과가 스트림 , 최종연산 : 스트림이 아님
- 기본형 스트림 IntStream , LongStream , DoubleStream
int[] arr = {1,2,3,4,5};
IntStream is = Arrays.stream(arr);
is.forEach(n->System.out.println(n));
_______________________________________________________
TravelCustomer customer1 = new TravelCustomer("홍길동", 10 , 100);
TravelCustomer customer2 = new TravelCustomer("김길동", 20 , 100);
TravelCustomer customer3 = new TravelCustomer("오길동", 30 , 50);
List<TravelCustomer> sList= new ArrayList<TravelCustomer>();
customerList.add(customer1); customerList.add(customer2);
customerList.add(customer3);
System.out.println("고객 명단 출력");
sList.stream().map(s -> s.getName()).forEach(s->System.out.println(s));
System.out.println("여행비용 합계 ");
int total = sList.stream().mapToInt(c-> c.getPrice()).sum();
System.out.println(total);
System.out.println("20세 이상 고객 ");
sList.stream().filter(c-> c.getAge() >= 20).map(c -> c.getName())
.sorted().forEach(s-> System.out.println(s));
_______________________________________________________
1.List forEach
List와 같은 Collection에서 forEach()는
다음과 같이 Consumer라는 함수형 인터페이스를 인자로 받습니다.
@FunctionalInterface
public interface Consumer<T> {
void accept(T t);
}
Consumer는 1개의 인자를 받고 리턴 값이 없는 함수형 인터페이스입니다.
default void forEach(Consumer<? super T> action) {
for (T t : this) { action.accept(t); }
}
Cosumer 객체를 forEach에 전달하여 List의 모든 아이템을 순회할 수 있습니다.
List<String> items = new ArrayList<>();
items.add("Paris"); items.add("Seoul"); items.add("Tokyo");
items.add("Washington");
:: items.forEach(name -> System.out.println(name));
items.forEach(new Consumer<String>() {
@Override
public void accept(String name) { System.out.println(name); }
});
_______________________________________________________
2. Set forEach
Set<String> set = new HashSet<>();
set.add("Paris"); set.add("Seoul"); set.add("Tokyo");
set.forEach(item -> System.out.println(item)); _______________________________________________________
3. Map forEach
Map.forEach()는 다음과 같이 BiConsumer라는 함수형 인터페이스를 인자로 받습니다.
default void forEach(BiConsumer<? super K, ? super V> action) {
Objects.requireNonNull(action);
for (Map.Entry<K, V> entry : entrySet()) {
K k = entry.getKey();
V v = entry.getValue();
action.accept(k, v);
}
}
BiConsumer는 두개의 인자를 받고 리턴 값은 없는 함수형 인터페이스입니다.
@FunctionalInterface
public interface BiConsumer<T, U> {
void accept(T t, U u);
}
BiConsumer 객체를 인자로 전달하여 Map의 모든 아이템을 순회할 수 있습니다.
Map<String, String> map = new HashMap<>();
map.put("Paris", "France");
map.put("Seoul", "Korea");
map.put("Tokyo", "Japan");
map.put("Washington", "USA");
:: map.forEach((k, v) ->
{ System.out.println("key: " + k + ", value: " + v); });
map.forEach((new BiConsumer<String, String>() {
@Override
public void accept(String k, String v) {
System.out.println("key: " + k + ", value: " + v);
}
}));
_______________________________________________________
4. Map.entrySet()에 대한 forEach
Map<String, String> map = new HashMap<>();
map.put("Paris", "France");
map.put("Seoul", "Korea");
map.put("Tokyo", "Japan");
map.put("Washington", "USA");
map.entrySet().forEach(entry -> {
System.out.println("key: " + entry.getKey()
+ ", value: " + entry.getValue());
});
_______________________________________________________
5. Array forEach
String[] array = {"Paris", "Seoul", "Tokyo", "Washington"};
Arrays.stream(array).forEach(item -> System.out.println(item));
_______________________________________________________reduce 연산
- T reduce(T identify, BinaryOperator<T> accumulator)
- 최종 연산으로 스트림의 요소를 소모하며 연산을 수행
ㄴ Arrays.stream(arr).reduce(0, (a,b)->a+b));
- 람다식을 직접 구현하거나 람다식이 긴 경우 BinaryOperator를 구현한 클래스를 사용 함
public class ReduceTest implements BinaryOperator<String> {
public static void main(String[] args) {
String greetings[] = {"안녕하세요" , "hello", "Good" };
System.out.println( Arrays.stream(greetings).reduce("" , (s1,s2) ->
{if( s1.getBytes().length >= s2.getBytes().length ) return s1;
else return s2;
}));
String str = Arrays.stream(greetings).reduce(new ReduceTest()).get();
System.out.println(str);
}
@Override
public String apply(String s1, String s2) {
if( s1.getBytes().length >= s2.getBytes().length ) return s1;
else return s2;
}
}예외처리
1. try-catch-finally
- log를 남겨서 추후 log 분석을 통해 그 원인을 파악하여 bug를 수정하는 것이 중요
- finally 블럭에서 파일를 닫거나 네트웍을 닫는 등의 리소스 해제 구현을 함
- try{} 블럭이 수행되는 경우, finally{} 블럭은 항상 수행 됨
- 여러 개의 예외 블럭이 있는 경우 finally 블록에서 리소스를 해제하도록 구현
- Exception 클래스를 활용하여 처리를 할 때 Exception 블록은 맨 마지막에 위치
- 시스템 오류(error) : 가상 머신에서 발생, 프로그래머가 처리 할 수 없는 오류
- 예외(Exception) :프로그램에서 제어 할 수 있는 오류
Arithmetic Exception :정수를 0 으로 나눈 경우 발생
NullPointerException : 초기화 되지 않은 Object를 사용하는 경우
ArrayIndexOutOfBoundsException :배열의 크기를 넘어선 위치를 참조하려는 경우
FileNotFoundException :참조하는 파일이 지정된 위치에 존재하지 않는 경우
ClassNotFoundException
FileInputStream fis = null;
try {
fis = new FileInputStream("a.txt");
} catch (FileNotFoundException e) {
System.out.println(e);
}finally{
if(fis != null){
try {
fis.close();
} catch (IOException e) {
e.printStackTrace();
}
}
System.out.println("항상 수행 됩니다.");
}
_______________________________________________________
2. try-with-resources ( 자바 7부터 제공 )
- close() 하지 않아도 자동으로 해제 되도록 함
- 해당 리소스 클래스가 AutoCloseable 인터페이스를 구현 해야 함
- 리소스는 try() 외부에서 선언하고 변수만을 try(obj) 와 같이 사용
public class AutoCloseObj implements AutoCloseable{
@Override
public void close() throws Exception {
System.out.println("리소스가 close() 되었습니다");
}
}
AutoCloseI obj = new AutoCloseObj();
try (obj){
throw new Exception();
} catch (ClassNotFoundException e) {
e.printStackTrace();
} catch(Exception e) {
System.out.println("예외 부분 입니다");
}
_______________________________________________________
3. 예외 처리 미루기 && 예외처리 만들기
- throws를 이용하면 사용하는 문장에서 예외를 처리할 수 있음
public class PassWordException extends Exception {
public PassWordException(String message) { super(message); }
}
public class PassWordTest {
private String password;
public String getPassword() { return password; }
public void setPassword(String password) throws PassWordException {
if( password == null ) throw new PassWordException("비밀번호는 null 안됨");
else if(password.length() < 5 ) throw new PassWordException("비밀번호는 5자이상");
else if(password.matches("[a-zA-Z]+")) throw new PassWordException("비밀번호는 숫자나 특수문자 포함해야함");
this.password = password;
}
public static void main(String[] args) {
PassWordTest test = new PassWordTest();
try {
test.setPassword("ee");
} catch (Exception e) {
System.out.println(e.getMessage());
}
}
}


java.util.logging 오류로그 남기기
  - 자바에서 기본적으로 제공되는 log package
  - jre/lib/logging.properties 파일을 편집하여 로그의 출력방식, 로그 레벨을 변경가능
  - 로그 레벨은 severe, warning, info, config, fine, finer, finest
  - 오픈소스로는 log4j를 많이 사용하고 있음

입출력 스트림
    대상 기준 : 입력 스트림 / 출력 스트림
    자료의 종류 : 바이트 스트림 / 문자 스트림
    기능 : 기반 스트림 / 보조 스트림

    바이트 단위 스트림 : 동영상, 음악 파일, 실행 파일등의 자료를 읽고 쓸 때 사용
    문자 단위 스트림 : 바이트 단위로 자료를 처리하면 문자는 깨짐,
                      인코딩에 맞게 2바이트 이상으로 처리하도록 구현된 스트림

    - System.out , System.in , System.err
      static InputStream in   : input stream.
      static PrintStream out  : output stream.
      static PrintStream err  : error output stream.

   A. 바이트 단위 입출력 스트림
    _______________________________________________________
    1. InputStream
		AudioInputStream
		ByteArrayInputStream
   		ObjectInputStream
		PipedInputStream
		SequenceInputStream
		StringBufferInputStream
		FileInputStream
		FilterInputStream

		주요 메서드
		 - int read()
			 입력 스트림으로부터 한 바이트의 자료를 읽습니다.
			 읽은 자료의 바이트 수를 반환
		 - int read(byte b[])
			 입력 스트림으로 부터 b[] 크기의 자료를 b[]에 읽습니다.
			 읽은 자료의 바이트 수를 반환
		 - int read(byte b[], int off, int len)
			 입력 스트림으로 부터 b[] 크기의 자료를 b[]의 off변수 위치부터 저장하며
			 len 만큼 읽습니다. 읽은 자료의 바이트 수를 반환
		 - void close()

			int i;
			try( FileInputStream fis = new FileInputStream("input2.txt")){
				 byte[] bs = new byte[10];
				 while( (i = fis.read(bs)) != -1 ) {
					for( int j = 0 ; j < i ; j++ ) {  System.out.print((char)bs[j]); }
					System.out.println(" : "+ i + "바이트 읽음");
				 }
			}catch(IOException e) {
				System.out.println("IOException" +  e);
			}
    _______________________________________________________
    2. OutPutStream
       ByteArrayOutputStream
       FileOutputStream
       FilterOutputStream
       ObjectOutputStream
       PipedOutputStream

		주요 메서드
		 -  int write()
			  한 바이트를 출력합니다.
		 -  int write(byte b[])
			  b[] 크기의 자료를 출력합니다.
		 -  int write(byte b[], int off, int len)
			  b[] 배열에 있는 자료의 off 위치부터 len 개수만큼 자료를 출력합니다.
		 -  void flush()
			  출력을 위해 잠시 자료가 머무르는 출력 버퍼를 강제로 비워 자료를 출력합니다.
		 -  void close()
			  출력 스트림과 연결된 대상 리소스를 닫습니다. 출력 버퍼가 비워집니다.

		  public static void main(String[] args) throws FileNotFoundException {
			  FileOutputStream fos = new FileOutputStream("output.txt");
				try(fos){
					byte[] bs = new byte[26];
					byte data = 65;        //'A' 의 아스키 값
					for(int i = 0; i < bs.length; i++){  // A-Z 까지 배열에 넣기
						bs[i] = data;  data++;
					}
					fos.write(bs);
			}catch(IOException e) { System.out.println(e); }
			System.out.println("end");
		}

        :: 두번째 파라미터가 false 인경우 파일명 중복시 기존 파일 삭제후 새로만듬
        :: true 인 경우 파일과 내용 유지됨.
		FileOutputStream fileOutputStream = new FileOutputStream(file, true);
    _______________________________________________________
    직렬화 ObjectInputStream , ObjectOutputStream

      - 인스턴스의 상태를 그대로 파일 저장하거나 네트웍으로 전송하고 이를 다시 복원
      - 자바에서는 보조 스트림을 활용하여 직렬화를 제공함
      - Serializable 인터페이스 : 직렬화는 인스턴스의 내용이 외부로 유출되는 것이므로
                                 해당 객체에 대한 직렬화 의도를 표시 해야함.
                                 구현 코드가 없는 marker interface
      - transient : 직렬화 하지 않으려는 멤버 변수에 사용함
                    (Socket등 직렬화 할 수 없는 객체)


   B. 보조 스트림
    B-1 문자 단위 입출력 스트림
    _______________________________________________________
    1. Reader
        FileReader  파일에서 문자 단위로 읽는 스트림 클래스
        InputStreamReader 바이트 단위로 읽은 자료를 문자로 변환
        BufferedReader 문자로 읽을 때 배열을 제공하여 한꺼번에 읽을 수 있는 기능 제공
           readLine()는 데이터를 라인단위로 읽어올 수 있는 메서드
           newLine()는 줄바꿈 해주는 메서드

		주요 메서드
		 -  int read()
				파일로부터 한 문자를 읽습니다. 읽은 문자를 반환합니다.
		 -  int read(char[] buf)
				파일로부터 buf 배열에 문자를 읽습니다.
		 -  int read(char[] buf, int off, int len)
				파일로부터 buf 배열의 off 위치로부터 len 개수만큼의 문자를 읽습니다.
		 -  void close()

        try( InputStreamReader irs =
               new InputStreamReader( new FileInputStream("reader.txt")) ){ }

		try( FileReader fis = new FileReader("reader.txt") ){
			int i;
			while( ( i = fis.read()) != -1 ) {
					 System.out.print((char)i);
			 }
		}catch(IOException e) {
			System.out.println("IOException" +  e);
		}
    _______________________________________________________
    2. Writer
        FileWriter  파일에서 문자 단위로 출력하는 스트림 클래스입니다.
        OutputStreamWriter  바이트 단위의 자료를 문자로 변환해 출력
        BufferedWriter  문자로 쓸 때 배열을 제공하여 한꺼번에 쓸 수 있는 기능을 제공

		주요 메서드
		 -  int write(int c)
				 한 문자를 파일에 합니다.
		 -  int write(char[] buf)
				 문자 배열 buf의 내용을 출력합니다.
		 -  int write(char[] buf, int off, int len)
				문자 배열 buf의 off위치에서부터 len 개수의 문자를 출력합니다.
		 -  int write(String str)
				문자열 str을 출력합니다.
		 -  int write(String str, int off, int len)
				문자열 str의 off번째 문자로부터 len 개수만큼 출력합니다.
		 -  int flush()
				출력하기 전에 자료가 있는 공간(출력 버퍼)을 비워 출력
		 -  void close()
B-2 문자 단위 입출력 스트림
_______________________________________________________
BufferedInputStream
약 8k의 배열이 제공되어 입출력이 빠르게 하는 기능이 제공되는 보조 스트림
DataInputStream
CheckedInputStream
CipherInputStream
DeflaterInputStream
DigestInputStream
InflaterInputStream
LineNumberInputStream
ProgressMonitorInputStream
PushbackInputStream 
File 클래스
   경로 구분자 > 윈도우; 유닉스:  ,  이름 구분자 > 윈도우\  유닉스/
   new File(File parent, String child) : 상위 주소와 파일 이름(또는 디렉토리)
   new File(String pathname) : 상위 주소
   new File(String parent, String child) : 상위 주소와 파일 이름(또는 디렉토리)
   new File(URI uri) : 파일의 uri 주소
|
File
|
getParentFile()
|
- 현재 파일의 상위 경로를 가진 File 객체 생성 (생성자에서 제공했을 경우)
Parent주소 없으면 null |
|
File
|
getAbsoluteFile()
|
- 절대 경로를 가지는 File 객체 생성
Parent주소 없으면 null |
|
boolean
|
mkdir()
|
- 생성자에 넣은 경로에 맞게 폴더 생성
|
|
boolean
|
renameTo(File dest)
|
- 경로가 같으면 이름 변경,
경로가 다르면 이름 바뀌면서 해당 경로로 이동 |
|
boolean
|
delete()
|
- 파일 삭제
|
|
boolean
|
createNewFile()
|
- 생성자에 넣은 경로 및 파일명에 맞게 파일 생성
- 중복시 false - 지정한 디렉토리가 존재하지 않으면 IOException을 발생 |
|
|
||
|
boolean
|
exists()
|
- 파일이 실제 존재하는지 판단
|
|
boolean
|
isDirectory()
|
- 디렉토리인지 판단
|
|
boolean
|
isFile()
|
- 파일인지 판단
|
|
boolean
|
canRead()
|
- 파일이 읽기 가능한지 판단
|
|
boolean
|
canWrite()
|
- 파일이 쓰기 가능한지 판단
|
|
boolean
|
canExecute()
|
- 파일이 실행 가능한지 판단
|
|
boolean
|
isHidden()
|
- 파일이 숨김파일인지 판단
|
|
int
|
length()
|
- 파일의 길이(byte) 반환
|
|
String
|
getName()
|
- 파일이름 Strng 반환
|
|
|
||
|
oolean
|
setReadable(treu/false)
|
- 읽기 권한 설정
|
|
boolean
|
setWritable(true/false)
|
- 쓰기 권한 설정
|
|
boolean
|
setExecutable(true/false)
|
- 실행 권한 설정
|
|
|
||
|
String
|
getPath()
|
- 경로를 포함한 파일이름
|
|
String
|
getAbsolutePath()
|
- 파일 또는 디렉토리의 절대 경로 추출
|
|
String
|
getCanonicalPath()
|
- 파일의 정규경로 추출
|
|
String
|
getParent()
|
- 현재 파일의 상위 경로 추출
( 파일이 속한 디렉토리 ) |
|
|
||
|
String[]
|
list()
|
- 현재 경로의 파일 또는 디렉토리 목록 추출
|
|
File[]
|
listFiles()
|
- 현재 경로의 파일 또는 디렉토리를
가지는 File 타입 배열 추출 |
|
문자열(파일,디렉토리면)의 처음이나 마지막에 있는 텍스트를 매칭
file.getAbsolutePath().startswith("s") :: true , false file.getAbsolutePath().endswith("txt") :: true , false |
||
import java.io.File;
public class Main {
	public static void main(String[] args) {

		// 파일의 주소 및 파일명을 가진 file 객체 생성
		File dir = new File("C:\\Users\\BBPC\\Desktop\\workspace\\Hello\\하하");
		dir.mkdir(); // 폴더 생성

		File file = new File(dir, "input2.txt");
		file.createNewFile(); // 파일 생성

        // 경로가 다르므로 파일 이름(input2.txt->input3.txt) 변경 및 이동 수행
		File file2 = new File("input3.txt");
		file.renameTo(file2);
        // file.renameTo(new File(dir , newName));

		System.out.println(file.exists());      // true
		System.out.println(file.isDirectory()); // false
		System.out.println(file.isFile());      // true
		System.out.println(file.canRead());     // true
		System.out.println(file.canWrite());    // true
		System.out.println(file.canExecute());  // true
		System.out.println(file.isHidden());    // false
		System.out.println(file.length());      // 10

        // "디렉토리 정보라면"
		if (file.isDirectory()) {
			String[] arr = file.list();
			for (String a : arr)
				System.out.println(a); // 폴더 내 모든 파일과 디렉토리 정보
		} else {
			System.out.println("File 객체가 폴더가 아닙니다.");
		}
	}
}
RandomAccessFile 클래스
입출력 클래스 중 유일하게 파일에 대한 입력과 출력을 동시에 할 수 있는 클래스
파일 포인터가 있어서 읽고 쓰는 위치의 이동이 가능함
public class RandomAccessFileTest {
public static void main(String[] args) throws IOException {
RandomAccessFile rf = new RandomAccessFile("random.txt", "rw");
rf.writeInt(100);
System.out.println("파일 포인터 위치:" + rf.getFilePointer());
rf.writeDouble(3.14);
System.out.println("파일 포인터 위치:" + rf.getFilePointer());
rf.writeUTF("안녕하세요"); :: 한글3 * 5글자 + null(2) = 17
System.out.println("파일 포인터 위치:" + rf.getFilePointer());
rf.seek(0);
System.out.println("파일 포인터 위치:" + rf.getFilePointer());
int i = rf.readInt();
double d = rf.readDouble();
String str = rf.readUTF();
System.out.println("파일 포인터 위치:" + rf.getFilePointer());
System.out.println(i);
System.out.println(d);
System.out.println(str);
}
}
728x90